When oh when is the holiday coming?

Standard

I’ve been busy this holiday season, in between shopping, getting our place ready to sell, and taking care of my girls (Jenna is eight, and Macy is almost four months old.) I’m also about to launch a new blog over at blogspot…I just bought my own domain: http://www.mrsmiraclesmusicroom.com. It will be up soon. No worries if you’re used to my old address though, wordpress should direct you there if you go to aileenmusic.wordpress.com. (Note: if you are following me at wordpress and start to not get notifications of my new blog posts, will you please let me know? I’m not sure how all of this will work out in the transition and don’t want to lose any followers!)

 Speaking of the holidays, there are many teachers out there who absolutely love to integrate the seasons and holidays into their lesson plans. I must confess, I’m not exactly one of them. While I love the change of the seasons, and I love the holidays, I don’t usually do that many songs and activities that are dependent upon the time of the year. Part of this has to do with curriculum—depending on whether I had the students the year before (since I teach with another music teacher), I may be teaching ta and ti-ti to my first graders in December one year, and in another year it might be November or January. I don’t want to have to completely change my lessons around just because there is a holiday coming up.

I know, I’m a Grinch!

Another reason, though, is that I’ve had students in the past who, for religious reasons, can’t celebrate holidays. If I do a holiday song while that student is in class, he/she has to be dismissed to another location, or they have to have an independent assignment with headphones. So usually, I just don’t teach to the holidays. Until, that is, my singalong.

The holiday singalong at my school happens in the thirty minutes before their winter parties, the last day before break. I have done a singalong every year since I’ve been in this district, and it’s very fun! There’s nothing quite like the whole school community (including kids, teachers, parents, and grandparents) singing together.

Preparation of the students doesn’t take too long–just the week of the singalong and the week before. Then, the afternoon of the singalong, the entire school comes down to the gymnasium. On the stage, I have a large screen on which I project a powerpoint with the lyrics to all of the songs. Some of the songs are accompanied (I either use CD accompaniments from the textbook series or play along on piano) and some of the songs we sing a cappella. We sing songs for Christmas, Hanukkah, and Kwanzaa. This year, we will be singing:

  • Up on the housetop
  • Winter Fantasy (a partner song with “Jingle Bells”)
  • When oh When (a Hanukkah song—more info below!)
  • Frosty the Snowman
  • Rudolph the Red-Nosed Reindeer
  • Feliz Navidad
  • Jolly Old St. Nicholas
  • Che Che Kodaly (an African folk song for Kwanzaa, to celebrate African heritage)
  • S’vivon Sov Sov (a Hanukkah song)
  • We Wish You a Merry Christmas

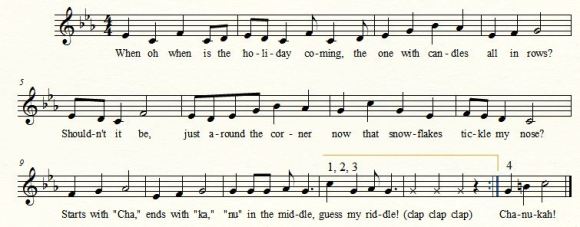
“When oh when” is one of my favorites, and is definitely one of my students’ favorites. In fact, just recently, I had a student ask me not when we were going to sing “Jingle Bells” or “Rudolph,” but when we would sing “When oh When.” I learned this song from my friend Naomi Cohen, at a Jewish music workshop she presented for TRIKE. The song is below:

 Image

Second verse: When oh when…the one with dreidels spinning spin? Shouldn’t it be…now that winter nips at my chin?

Third verse: When oh when…the one with gifts for me and you? Shouldn’t it be…now that slush creeps into my shoe?

Fourth verse: When oh when…the one with latkes sizzling hot? Shouldn’t it be…now that all my windows are shut?

The song is from a recording by Leah Abrams, recorded in Cedarhurst, NY by Tara Publications. It is also on the website oysongs.com.

There are many things I love about this song: the melody is enchanting, the riddle is fun, and let’s face it—it’s so much better than “Dreidel, dreidel, dreidel, I made you out of clay”!

On a side note, if your district or your local chapter is interested in learning more about Jewish music, I highly recommend Naomi! She has a rich knowledge of Jewish culture, songs, and dances, and is a joy! Her email address is nkcsings@yahoo.com.

What do you do for the holidays? Have you ever tried a singalong? Or are you thinking about trying it now?
Do Pentatonic Practice (and a contest!)

Standard

So far the last month, my third graders have been busy practicing the do pentatonic scale. (They are a bit behind typical curriculum, as I didn’t have them in Kindergarten.) We’ve been singing and playing favorites like “Great Big House,” “Rocky Mountain,” and “Oboshinotentoten.” When I presented the do pentatonic scale, we discussed how “penta” means “five” (comparing this to a pentagon) and “tonic” means skip (and they figured out that the skip in the scale was between mi and sol.) Then we did more practice reading, writing, identifying, and creating patterns with do, re, mi, sol, and la.

I was really excited to find a do pentatonic product on Teachers Pay Teachers. Emily F created this great product; you can find it by clicking on the picture below:

Image 

The product includes many do pentatonic songs, interactive powerpoints, Orff arrangements and lessons, as well as assessments. I was especially excited about the solfege mad minutes; I’ve done mad minutes with note letters on the treble clef staff, but never with solfege. How brilliant! My kids were also very excited about how the solfege letters “fly” up to the rhythm on the powerpoint slides. There were lots of “oohs” and “aahs.” And at $6, it’s a great deal for all of the material you get.

I’ve also been using my do pentatonic bingo set. You can find it by clicking on this picture:

Image

During the first lesson, I put an image of one of the bingo cards on my SMART board. I sang a few patterns with solfege, and the students had to come up to the board and cross out the patterns I sang. Then I made it trickier, and played the patterns on the recorder! Great way to check their inner hearing!

During the second lesson, we played the bingo game. I printed out the set I made onto cardstock, and all students received bingo chips. They put one bingo chip on the free space, and then have to get five down, five across, or five diagonally in order to get a bingo. Again, I begin by singing the pattern, having the students echo me, and then having them find that pattern on their card. All of the cards are different, so they can’t look at any other student’s card! After a few sung patterns, I then play some patterns on the recorder and have them find those patterns. Students who get a bingo can get some kind of reward if you’d like (a sticker, a small prize, etc.) or just the satisfaction of winning! They really love playing the game, and get very excited when they have a pattern…and especially when they get a bingo!

You can do this game again in another lesson…they are happy to play again! In the last lesson, I hand every child the same bingo sheet, printed on regular paper, along with a pencil. We do the same process—singing some patterns, then playing—and they have to cross out those patterns we’ve done. Then I collect those papers and use it as an assessment. Were they able to find the correct patterns among a mass of other melodic patterns? Could they find the patterns even when they were played on the recorder?

I’d like to do my first-ever contest; the winner will receive a free Do Pentatonic Bingo Set! To enter the contest (I just changed the process so it’s a bit easier!):

  • Go to my store at Teachers Pay Teachers (http://www.teacherspayteachers.com/Store/Aileen-Miracle) and follow me (click the star by my name.)
  • Then comment on this blog or on my Facebook page so I know to enter you into the contest. I’ll draw names on Monday, December 10 and will announce the winner!

Thanks, and good luck!

Agenda for the lesson

Standard

Throughout my career, I’ve been on the board of several different music education organizations. Each board meeting is a great chance to see old friends, and help guide the future of the organization. At each board meeting, we receive an agenda of the items we will be discussing. During the meeting, I find myself looking occasionally at the agenda—seeing where we’ve been and what we still have left to discuss. Having this list calms me a bit; like many people, I enjoy knowing the direction of the meeting.

I bring this up as a comparison to the students in our classrooms. For years, I have left the “agenda” for the day’s lesson a mystery to students. I thought this was best, as it gave the students a chance to discover what would happen next instead of being told. But recently I entered into a discussion on Facebook about this very issue and it had me reconsidering my previous practices. (Note: If you are not part of the “Kodaly Educators” group, I highly recommend it! Search for the group on Facebook, or send me a message and I can add you.)

The question on Facebook was posted by my friend Naomi.. She asked if others had posted a list of the lesson’s activities and goals on the board. Many other Kodaly-inspired educators posted some really wonderful ideas and thoughts, including:

  • A list on the board can be very helpful for students who like routine, especially those with autism.
  • A general list can work, like “Sing and play!”, “Time to think,” “Let’s play a game!”, “Let’s write!”, “Relax and listen,” and “Goodbye song.”
  • Icons of activities can also work.
  • You can put a clip on the board as to which part of the lesson they are on, or write a check mark once you are done with that part of the lesson.
  • If students aren’t listening well and you have to cut a game out of the lesson, they can visually see what they are missing out on!
  • You could put up verbs on magnetic/ laminated strips such as “sing,” “improvise,” “play,” “conduct,” “dance,” “discover,” etc. At the end of class, you can invite students to move those words over to a part of the board that reads “Today in music we got to…”


A special thank you to Naomi Cohen, Susan Brumfield, Lynn Makrin, Kristen Bamberger, Cecile Johnson, Sandra Mathias, Stephanie Benischek, Heidi Brueggemann McIlroy, Susan Garrett, Vicki Ray Strode, Anita Swanson Gadberry, Jennifer Guenzel Kimock, Gretchen Liechty Lynch, Andrea Halverson Forsberg, and Keira Lynn for all of the wonderful ideas!


Since reading this conversation on Facebook, I created a SMART board file for each lesson which lists the songs/ activities as well as the “I can” statements. Since I don’t want them to know every single song in the lesson—as they sometimes have to identify a song by its melody or rhythm—I sometimes use phrases such as “mystery song,” “singing game,” or “play instruments.” I’ve noticed some of my students looking up at the board and processing what they are about to do, or what they have done. When we finish an activity, I try to put a check mark by those we finished.


I also had a conversation with some colleagues in my district about this issue. One of them mentioned choosing a “summarizer” at the end of music class to help explain what we did and/or what we learned that day in music. I worried that the students would rely too much on the list on the board to describe what we did that day, but have been pleasantly surprised. Sometimes the students say “we played the game for ‘Dance Josey,’” but then sometimes they give wonderful answers like “We learned that the time signature tells us how many beats are in each measure,” or “we created patterns in the do pentatonic scale.” It is then I know that students have truly synthesized the material, and like an agenda in a board meeting, they know where we’ve been and where we are going!

Musical alphabet and treble clef

Standard

Recently I had a colleague ask me how I practiced the musical alphabet and the treble clef with my students. I typed up some activities for her and thought I’d go ahead and post it to my blog.

First, here are some activities for helping students to get more comfortable with the musical alphabet (a special thank you to Joan Litman for many of these ideas!)

  • Up and down the alphabet: Have the notes of the musical alphabet written on the board vertically. Start with A, end with G, and then write A again. The teacher points to the letters going up and down and the students say those letters (i.e. A B C D C B C D E F G A G F E, etc.)
  • Ball game: Students say the letters of the musical alphabet as they pass a ball around the circle. When the teacher plays the hand drum, students switch the direction of the ball and the direction of the musical alphabet. For example, the students might say “A B C D,” and then the teacher plays the hand drum, and they’d switch the direction of the ball and say “C B A,” etc. In the next lesson, only the student who holds the ball says the letter.
  • “You say a letter”: I’d love to cite a source for this, but I learned it in my student teaching and haven’t seen it since. The chant goes like this:

After the word “behind,” the teacher says a letter, like “B,” and then the students say the letter before, the original letter, and then the letter afterwards (A B C.) If the teacher says “O,” the class would respond “N O P” (while doing the motions pat/ clap/ snap.) After doing this a few times, students figure out what the teacher was doing, and then they offer other letters.

The next time students do this activity, we try it with the musical alphabet. So if a student offers “G,” students would respond with “F G A.” The students love this chant, and it’s a great way to get comfortable with the musical alphabet.

Her are some ideas for getting comfortable with the staff:

  • By the time my students are learning the note letters on the treble clef staff in my classroom, they’ve worked with the staff quite a bit, labeling solfa. So they should be able to find the lines and spaces well. When preparing note names with the treble clef staff, I first start finding the lines on the staff. Then I show the treble clef, explain it is sometimes called the G clef because it crosses the G line four times, and I tell them about silly sentences for the lines. Examples include:
    • Every Good Boy Does Fine
    • Every Good Boy Deserves Fudge
    • Elvis’ Guitar Broke Down Friday
    • Elephants Got Big Dirty Feet
    • Empty Garbage Before Dad Flips

The students find E, G, B, D, and F on the staff during that lesson.

  • In the next lesson, we review the lines, and then find spaces. I explain that the space notes rhyme with space—F A C E. Again, the students find those notes on the staff (I use the SMART board for this, but you could you any board, having students place notes in certain spaces.)
  • In the next lesson, students practice both lines and spaces. You could place notes on the staff and ask them which note it is, and/or tell students a note and have them place it on the staff.
  • “Mad Minute”: See this worksheet:Mad Minute. I use this as a formative assessment to see how students are doing with note names. They get 60 seconds to fill out as much as they can. Once I’ve done quite a bit of practice, I do a “mad minute” for a summative assessment.
  • SMART Board Files: There are plenty of great SMART notebook files to practice note letters! Check out the SMART exchange website for some great downloads (try searching “note names” or “treble clef.”)
  • Note name learning centers: I’ve enjoyed using learning centers in my room for the past two years (see https://aileenmusic.wordpress.com/2012/04/10/learning-centers/ for more info.) With the learning centers, I had one group at the SMART board working with a note name file, another group playing a jumping game with a floor staff (first one to jump to B wins), another group figuring out how to play a song on the treble clef on their recorder, and another group figuring out how to play a song on the treble clef with barred instruments. During the jumping game, I pulled students who had trouble with the first mad minute so I could work with them individually. This was a great chance for intervention! Then during the next music class, I did the second mad minute for a summative assessment.
  • I just bought the “Freddie the Frog” book, which I understand is a great book for treble clef practice. You can buy the first book in the series here: http://www.amazon.com/Freddie-Frog-Thump-Night-Adventure–Treble/dp/0974745499/ref=sr_1_1?ie=UTF8&qid=1353379531&sr=8-1&keywords=freddie+the+frog.

Any other ideas? Please post them below!

Ghost Melodies

Standard

I’m always looking for ways to include vocal exploration in my lessons–especially with my younger students. Vocal exploration is a great way to help students find their head voices. One of my favorite vocal exploration activities is ghost melodies. For this, you can draw a ghost on the board, and then draw the sound the ghost makes, by drawing a small hill and a big hill, loops, or whatever you’d like. Then you have the students explore their voices by going from low to high for each hill, getting higher as the hills get higher. (If this is confusing, see the pictures below…hopefully it will make sense!)

I have uploaded my ghost melody file for the SMART board to the SMART board download section of my website: kodalycorner.weebly.com. You don’t have to have a SMART board though–simply draw a ghost on the board and then the ghost’s melody. You can change the activity depending on the time of year–leaf melodies for fall, snowflake melodies for winter, etc. After you’ve drawn a few melodies, students can come up and draw their own melody.

This year, I decided to extend this activity. EVERY kid wants a turn to draw their own melody, and sometimes there is just not enough time! So last week, I handed all of the students their own dry erase board, marker, and sock eraser, and had them draw their own ghosts, and then their own melodies. Then, on the count of 3, we all did our melodies together. It sounds chaotic but in a really wonderful way! Kids are exploring, creating, and having so much fun! Here are a few pics from one of my Kindergarten classes:

Check out the bats! So cute!

Love the ghost’s stitches…looks very spooky! And his melody was fun to listen to as well! And one more…

This is a great activity for Halloween, but can be done any time of the year. The latest Ohio music standards for Kindergarten include “Create a visual representation of sound,” and this is a great way to do just that!


Llama Llama Red Pajama

Standard

I love using children’s literature in the music classroom whenever I can. After paging through “Llama Llama Red Pajama” by Anne Dewdney, I noticed that there are two recurring rhythmic patterns in the text:

With these repeating patterns, I knew I could use it to prepare or practice “ta” and “ti-ti.” When preparing quarter notes and eighth notes, I use the terms “long” for one sound on a beat and “short-short” for two sounds on a beat. Last week, after presenting “long” and “short-short,” I read the book “Llama Llama Red Pajama.” Then we did the following:

  • Discussed what happened in the story (students can make real life connections to their bedtime routines)
  • Read the first few pages again and had students clap the rhythm as they spoke the text
  • Focused on one page and had students figure out the rhythm with “long” and “short-short.” I downloaded this file from SMART Exchange so that the pictures from the story could be projected onto the SMART board, and then we could write the corresponding patterns on the SMART board: http://exchange.smarttech.com/details.html?id=1726685f-9dda-4e5d-91ed-87298247e317.

There is a series of “llama llama” books, including “Llama Llama Time to Share,” “Llama Llama Home with Mama,” “Lllama Llama Misses Mama,” and more.

Other great books for “ta” and “ti-ti” include “Orange Pear Apple Bear” by Emily Gravett, “Please Puppy Please” by Spike Lee and Tonya Lewis Lee, and “Doggone Dogs” by Karen Beaumont and David Catrow.

Lookimg for more ideas for ta and ti-ti? Check out my “Songs and Activities for Teaching Ta and Ti-Ti” on Teachers Pay Teachers: http://www.teacherspayteachers.com/Product/Songs-and-Activities-to-Teach-Ta-and-Ti-Ti.

The product includes:

  • Notation and games for five songs/chants
  • Composition mini-lessons for “Orange Pear Apple Bear”
  • Learning center directions
  • Flashcards
  • Three SMART board files (Surprise Symphony, koosh ball, and form work)
  • Pre- and post- tests
  • Picture worksheet

Have any other great books for ta and ti-ti? Please list them below. Happy reading!

Offering Choices, Part III

Standard

My last two blog entries have been about offering students more choices in the music classroom (visit https://aileenmusic.wordpress.com/2012/10/21/offering-choices-part-ii/ and https://aileenmusic.wordpress.com/2012/10/10/offering-choices-part-i/.) Here are some final ideas about offering students choices:


Creating a thunderstorm: Kathleen Neds was my long-term sub for my recent maternity leave, and she did this with my 3rd, 4th, and 5th graders. The kids raved about it, so I tried it with them once I came back, and I was impressed with both their musicality and their creativity. Students can go to any barred instrument, the rainstick, the thunder tube, the gong, drums, or scarves (or anything else in your room that might sound or look like a thunderstorm.) The first time you do this, you can conduct the students, showing which instrument players to play when, and when the students with scarves should start moving. The idea is to create the sound of a thunderstorm, by starting slowly and quietly (barred instruments can play glissandos or go back and forth between notes, drummers can make a circular motion on their drums and then switch to hitting, the gong player can play quietly at first, then get louder and louder) so that students crescendo into a very loud, intense thunderstorm. Then, the sounds die down and everyone gradually stops. Once students are comfortable with this, one student can be chosen to conduct, and can choose who plays when, how loudly or quietly, when to stop, etc. This is a wonderful opportunity to have students make musical choices! Kathleen had students then watch a you tube video of Eric Whitacre’s “Cloudburst,” which is a beautiful choral piece imitating a thunderstorm. It can be watched here: .

Another listening example you could use is Beethoven’s Pastoral Symphony, which was written in part to imitate a thunderstorm. It can be watched here:.

After watching it, we discussed how it was similar to a thunderstorm. I also had them close their eyes and imagine a thunderstorm. What did they see? What did they hear?   One more extension is the book “Listen to the rain” by Bill Martin Jr. and John Archambault, illustrated by James Endicott. First, I read through the book. Then we go back through the first few pages, and I have students show me with their voices or bodies how they might represent that page (perhaps hitting their laps for “the slow soft sprinkle,” or making wind sounds on “the whisper of the rain.”) Then we read the book again and students accompany with their bodies or voices. Perhaps all of the students will be doing the same thing—or maybe not!


Jeremiah Blow the Fire: This fun chant goes like this:

Jeremiah, blow the fire, puff, puff, puff!

Jeremiah, blow the fire, puff, puff, puff!

First you blow it gently, then you blow it rough!

Jeremiah, blow the fire, puff, puff, puff!


After the students know it well, I say it for them, but ask them to listen to what I have changed. Then, I whisper “puff, puff, puff,” and they identify the change. The next time I say it, I change “first you blow it gently” to a singing voice on sol-mi, and “then you blow it rough” in my low “grumbly voice.” They identify those as well. Then we try to say it with all of those changes. It’s a great way to identify different types of voices.

The next lesson, we speak it through with all of those changes. Then I show them several non-pitched percussion instruments (i.e. rhythm sticks, triangles, egg shakers, wood blocks, etc.) I ask them which instrument should play on “puff, puff, puff,” “first you blow it gently,” etc. I draw pictures of those instruments by the lyrics on the board. I have students choose which instrument they would like to play, and then we play their arrangement of the chant.


Choosing learning centers: Several months ago, I wrote a blog about using learning centers in the music classroom. You can read it here: https://aileenmusic.wordpress.com/2012/04/10/learning-centers/. If you have time after the students have rotated to all the stations, you can have them choose their favorite and go to that station. It’s interesting to see which centers the students choose as their favorites, and it gives them one more time to do their favorite activity of that music class!

Offering students choices during music class may seem a bit intimidating at first, but in my experience, it is actually very rewarding to give up control of the classroom and have students steer the lesson where they would like it to go! If you have any other ideas, please post them below. Have fun!

Offering Choices, Part II

Standard

In my last blog, I wrote about offering students choices in the general music classroom (visit https://aileenmusic.wordpress.com/2012/10/10/offering-choices-part-i/ to read.) Today I’ll continue this topic with more ideas that have worked for my students.

  • Highway No. 1 by the Shenanigans: This is a wonderful dance the students absolutely love. Highway No. 1 is a highway that goes around the perimeter of Australia. During the dance, students pretend to drive, and then do dance steps that are spoken to them, like “walk, walk, clap, clap, clap,” and “skip, skip, and bob.” They drive around again, then do the next movement sequence. The music can be purchased through I-tunes, but also look for the “backing version with instructions.” This version has the same music, but leaves the narration for the dance steps blank so students can fill them in. Students can brainstorm seven different ways to move; those can be written on the board and students can do them in order. Conversely, students can be chosen to create them on the spot. I’ve done the dance with 1st, 2nd, and 3rd graders, all with success!
  •  “Oh A Hunting We Will Go” by John Langstaff and Nancy Winslow Parker: This children’s book has the lyrics for “Oh a hunting we will go,” in which we’ll catch a mouse and put him in a house, catch a snake and put him in a cake, etc. Students immediately recognize that it is a rhyming song, so after the book is sung, they can create their own lyrics. I have students first think of an animal, and then they think of something that rhymes. Always fun when students leave the room singing their own verses!
  • Flashcard improvisation on Orff instruments: After I present a new rhythmic concept, I often have students improvise using rhythmic flashcards. For example, if my students are practicing tika-tika (sixteenth notes), I’ll first have students read some rhythmic flashcards with tika-tika. Then they’ll go to barred instruments set up in C pentatonic (with the F and B bars down.) I’ll say “1, 2, ready and,” and students will play whatever they want melodically to the rhythm they are being shown. Students can use 1 mallet or both mallets. Then we’ll do the next pattern with a different melody. For example, if the pattern is “ta ta tika-tika ta,” students might play “C D EEEE G” or “G C DDDD C.” The great thing about C pentatonic is anything sounds good, so it is a non-threatening environment for students to create their own patterns. And it’s a great way to practice those new rhythms!

A few more ideas to come soon! Have fun!

Offering Choices, Part I

Standard

As Kodaly-inspired teachers, we are sometimes criticized for being too scripted in our lessons, for not allowing the students to choose and create as much as we should. While Kodaly-inspired lessons offer the students a chance to sing, play, move, dance, read, write, and more, I think there is some validity to this criticism. We write lessons with smooth transitions from one activity to the next, but often, many of our activities are chosen by us, instead of the students.

At last year’s  OAKE conference in Phoenix, I attended two excellent sessions about student choice, presented by Crystal Schlieker and Nyssa Brown (see Nyssa’s blog at http://21stcenturymusiceducation.wordpress.com/). Both offered wonderful ideas about how to increase opportunities for student choices. After these sessions, I began to offer more and more choices to students, and found that letting go of this control was actually freeing! The next few blog entries I write will be about this topic, with my own ideas as well as ideas from Nyssa and Crystal (thank you to both of them!)

Activity 1: Aiken Drum

This is a song I learned in my student teaching, and have used ever since. It’s a wonderful listening experience for the students, and they get to choose the food for each body part of Aiken Drum!  After singing “eyes are made of jellybeans,” we sing the melody again and students decide what his nose is made out of, then mouth, then shoulders, etc. I do as many body parts as time allows, but typically start at the top of the body down to his feet, and then end with hair. I have accompanied the song with autoharp, dulcimer, and guitar, and the students are just enchanted and thrilled by this odd man made of food!

Activity 2: “Bringing the Rain to Kapiti Plain” by Verna Aardema

Nyssa presented this book at her session about divergent thinking. It is a cumulative book, so for each part that is repeated (“this is the cloud,” “this is the grass,” “these are the cows,” etc.) students choose a sound or a motion that could represent that part. The first time I used the book, I read through it all and asked the students what the story is about and what pattern they noticed. We compared the cumulative aspect of it to “There was an old lady who swallowed a fly” (the students made that connection without me asking!) Then we had time to choose the motions/sounds for the first three parts. In the next lesson, we recalled the motions/sounds they’d already come up with, and then continued and finished the book. I had planned to continue this process in another lesson with instruments—having students choose what to play on which instrument—so I was excited when students were one step ahead of me and chose the thunder tube, rainstick, and glissandos on the glockenspiels without me mentioning the use of the instruments. Each class had different motions and sounds, so it was lovely as a teacher to hear several different versions of the story!

 Activity 3: Students choose the next activity

This was a suggestion by Crystal Schlieker during her session. Often, when we write lessons, we decide what song will happen when. Instead, have a portion of your lesson in which one of three songs could work, and students get to vote on which one they’d like to do next. I’ve also had reward days after students have exhibited good behavior for a marking period or semester. They brainstorm a list of songs, games, and activities they love to do, and then they vote on their three favorite activities, and the class gets to do their favorites during the rest of the class.

Activity 4: Jump in, jump out

This great name game was presented by Nyssa during her session. You can see it here:

The words I learned (which are slightly different than the video) are:

Jump in, jump out,

Turn yourself about, I said

Jump in, jump out,

Introduce yourself.

My name is _________________ (yeah!)

And I like ________________ (yeah!)

I’m gonna keep likin’ it (yeah!)

For the rest of my life (for the rest of your life!)

I did this name game with my third, fourth, and fifth graders at the beginning of the year, and they loved it! It’s a great way to learn more about each student, as they choose what they’d like to share. They can also choose different lyrics; instead of “I’m gonna keep likin’ it,” they might say, “And it is awesome,” or whatever they choose.

I’ll be following this up with more ideas soon! Have fun!

Sub Plans

Standard

Today is my last day of maternity leave. I feel conflicted—excited to see my students again and teach, but sad to leave my baby girl. My students have been very fortunate to have a wonderful substitute teacher during my maternity leave. She is Orff-trained and has taught really creative lessons with the students, while also following my written lessons and year plans. She will be subbing for me again in the next couple of weeks, and I know I can leave my normal lesson plans for her and it will go very well.

That, of course, is not always the case. We do not always have musically trained teachers subbing for us, and it can be very difficult to write something that both meets musical goals and can be followed by a substitute. I have found sub plans to be a very frustrating part of my job—as organized as I am with writing my typical plans, I have felt very disorganized with sub plans. I find myself spending hours each time I have an absence, trying to come up with something that will work.

Recently, on pinterest, I found this idea of a “sub tub”: http://steveandcat.net/mrswalker/sub_tub.htm.  I also found this blog about writing music sub plans: http://kodalymusicteacher.wordpress.com/2012/04/04/the-dreadedsubplans/. Both offered great ideas about putting together sub plans, so I decided it was finally time to get myself organized with sub plans!

In years past, I’ve created sub plans for the entire day, which included several different lessons by grade level. I decided when organizing my sub plans that it would be much better to save the sub plan to my computer by grade level, so they are easier to find and organize. I found all of my old sub plans, and re-organized them by grade level. Now, when creating my sub tub, I will have a plastic tub with file folders containing the following:


  • Procedures, rules, and schedule: This will include standard classroom procedures, music rules, consequences, duty and drill procedures, instructions on using the SMART board and I-pod, and my weekly music schedule.
  • Grade level sub plans: I will have file folders labeled by grade level, and each folder will contain at least three different sub plans appropriate for that grade level.
  • Materials: I will put materials in the sub tub such as props, books, and DVD’s needed for the lesson. If I often use one of the needed materials, I will indicate in the written lesson where to find that material.
  • Checklist: I have created checklists for each grade level, with the class names listed in horizontal rows and the lesson plans listed in vertical rows. Each time a sub plan is used, I can check off which lesson and which class. This way I can easily keep track of which lessons I can still use.


Now, when I have an absence coming up, I can look through my sub tub and easily compile sub plans. I’ve saved all of these lessons to my home computer, so if one of my daughters gets sick in the wee hours of the morning, I can simply go to my computer, figure out which lessons to use, and write the sub directions, referring her/him to the appropriate lessons within the sub tub.

Below I am including two sample sub plans that you could easily use. For the 4th grade lesson, if you do not have a SMART board, you could use a LCD projector hooked up to your computer, or with the proper connection, project the website onto a TV.

4th Grade Young Person’s Guide

1st, 2nd, and 3rd Grade Jazz Fly

Any other ideas for sub plans? Please comment below. Happy lesson planning!